Wednesday, November 30, 2011

Advent

Advent - the coming of Christ into the world.
This year I wanted to introduce Advent to my three children. (I know, my oldest is 10 years...I'm a little late). We have always stressed that Christmas wasn't about presents and trees and Santa and lights...my children have always known that we were celebrating the birth of Christ our Savior. Now that they are all old enough to understand the story deeper, I thought that it was the perfect time start Advent.

After researching many ways to do Advent, I chose to go with my friend's recommendation from www.icanteachmychild.com. Truth in the Tinsel is an eBook that you purchase online and then print out. It is a simple, beautiful, organized way to celebrate Advent. I highly recommend this to any family. By the time we reach Christmas Day my children will have each made an ornament that tells about the birth, life and promise of Jesus.
You can visit www.http://impressyourkids.org/truth-in-the-tinsel-challenge/ to purchase the eBook for only $4.99.

After printing out and putting the Truth in the Tinsel in a nice, sturdy binder, I decided that I wanted some sort of Christmas countdown that correlated with the Advent book. I did some searching on Google and found a few websites where the countdown's were made from a
24 mini muffin pan. I grabbed my Michael's, JoAnn's, and Hobby Lobby coupons and headed off to get the few supplies I needed to complete this project.

Muffin Tin Christmas Countdown


Supplies Needed:
24 mini muffin tin (found mine at Hobby Lobby, used my 40% coupon)
few sheets of Christmas scrap book paper
card stock to match scrap book paper
permanent marker
Christmas stickers and/or Christmas brads (I used stars and snowflakes...see below)
white school glue
small, round foam stickers - to apply the circles that represent the numbers
scissors or circle punchers - I used a 2 1/2" diameter circle for the main circle and a 3/4" circle punch for the countdown numbers (1-24)
Magnet dots, Magnet tape, etc....
Ribbon (optional)
3M hook (optional)

Cut or punch out 24 circles 2 1/2" in diameter from the scrapbook paper AND matching card stock paper. My scrapbook paper came from Michael's and it was two sided.
I used two 12"x12" pieces of scrap book paper for this project.


Here is a look at some of my supplies...round foam stickers to apply the smaller .75" circles that I wrote the numbers 1-24 on, card stock, 3/4" circle punch, card stock, adhesive magnets, and Christmas ornament stickers from Michael's.

These are the snowflake and star brads that I mentioned above in the supply list.
These came from Michael's.

I stuck the snowflake and star brads in assorted 2 1/2" circles.

The back of the circle after inserting the snowflake brad.

Next, I glued a card stock circle over the brad. I glued a card stock circle onto ALL of the 2 1/2" circles. It gave the circles a more sturdy feel.

Gluing the card stock over the brad as mentioned above. Remember to glue card stock to all large circles to make them more sturdy.

Next, I cut out 24 smaller circles with my 3/4" punch. I placed an adhesive round foam circle on the back of each circle and then wrote the numbers 1-24 on each one.

After preparing the number circles, I peeled off the back of the adhesive and then put one on each of the larger 2 1/2" circles.

Almost completed....after adhering the numbers, attach two small magnets to the outer part of the back of the large circles. The magnets will make the circle attach to the muffin pan.

If you want to keep your Muffin Tin Christmas Countdown laying as it is for display then you are finished with the project. I decided to hang mine on a kitchen cabinet using a ribbon and 3M hook which is placed upside down on the back of my cabinet as shown below...

...hanging on my kitchen cabinet.

...a closer look.

I added a bell on a red ribbon to the bottom of the muffin tin for fun!

Now what will I put inside each circle???
The eBook, mentioned about has print outs that give children clues about the daily Advent topic...for example Day 1 is Flame. On Day 1 (which is the #24 circle on the muffin tin since we are counting down) we will be reading Isaiah 9:2-7 and making a candle light ornament.
Can you see the clue folded up in the muffin tin? We will also be adding small candies, pieces of paper telling our children we will be doing various activities that day such as:
watching a Christmas movie (The Nativity Story, Elf, Polar Express, The Grinch, etc...),
going to pick out our live Christmas tree, make brownies, cookies, etc...,
going to get frozen yogurt/ice cream, family game night...
BE CREATIVE...you can pretty much do/plan what ever you want! If you have a treat too large to fit into the muffin tin, make a scavenger hunt or leave a treasure map for the kids to find the larger items! I have decided to plan only three days at a time because I don't want the muffin tin to become too heavy for the hook and I never know what our schedule looks like.

If you have any questions, please ask! Merry Christmas to you and your family! God Bless!


Monday, September 19, 2011

Friday, May 27, 2011

Happy Mother's Day....a little late!

As I was doing my Spring cleaning (a little late), I found my Mother's Day card that Weston had made me at school. It was buried underneath a months worth of papers that seem to magically stack up in the kitchen. So, as I'm cleaning I find found this and needless to say, the tears started flowing. How blessed I am to have an incredible, loving, and caring son!

Happy Mother's Day
by Weston

I can hear your graceful voice wake me up. I love when you geive me hugs every night. Everyday I can hear your voice in my head and I think about you. At all of my baseball games you cheer me on. You clean the house, you clean my clothes. I feel so special that I have a mom like you. You help me with my homework. You help me clean my room. You make me wonderful breakfastes, lunches, and dinners.
You're the best mom ever. I love you.
Happy Mother's Day

Saturday, January 29, 2011

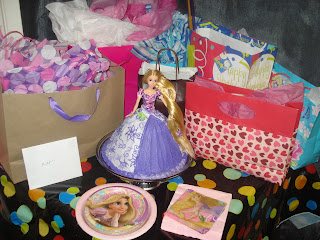
Happy Birthday Karli!

Happy Birthday to my sweet (and super silly) Karli!

We celebrated with her soccer and school friends at Walls of Clay in downtown McKinney. Each guest got to paint a 6" x 6" ceramic tile that will be fired. The kids loved painting! I can't wait to see the final outcome of the tiles! It is so nice to not have to worry about having the party at our house! The noise level was insane! Twelve girls can make a lot of noise!!!!


Tangled Rapunzel Cake


Jovie


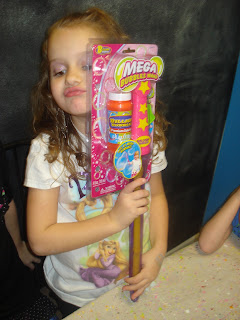
The grand finale gift....


Thursday, January 27, 2011

Groovy Cupcakes


My sweet daughter, Karli, turns 7 this weekend and what better way to celebrate her birthday at school than with these fun, colorful, groovy, tye dye cupcakes! I made these last weekend for my sister-in-law's birthday and they were very delicious and FUN! I thought that a bunch of 1st graders would enjoy these!

I have had a few people ask me how to make these so I documented my experience this time with pictures. It is super simple but it does take a little bit more time than if you were making regular cupcakes.

Step 1: Recipe - Tye Dye Cupcakes

1 package white cake mix (I have used Pillsbury and Duncan Hines)
3 egg whites
1 1/3 cups water
2 Tbs. Canola oil

Preheat the oven at 325 degrees (for dark metal or nonstick pans) or 350 degrees (for glass and shiny metal pans). Line cupcake pans with white liners. Beat the egg whites on high for one minute or until frothy. Add cake mix, water, and oil and mix on medium speed for two mintues. Divide batter into small bowls according to how many different colors you want. In this case I used five different colors.


I prefer to use AmeriColor food coloring which can be found at Hobby Lobby and Williams & Sonoma. I also use Wilton but I have found that AmeriColor gives brighter, bolder colors! Only use gel food coloring. Liquid food coloring (in the droppers) will change the consistency.


After coloring the batter, add a small amount of each color of batter into each cupcake liner. Sometimes you you will not have enough of each color to go into each liner and that's ok! Each cupcake will be unique. Here is a picture of what this step will look like:


Next, using a toothpick, slightly swirl the batter. DO NOT over swirl the batter or the colors will combine and make an awful grayish brown color! A figure eight motion usually works well. This step can also be skipped if you don't want a swirly appearance.


Bake the cupcakes for 18-23 minutes, using a toothpick to check for doneness. If a toothpick inserted into the center of a cupcake comes out clean then the cupcakes are ready to be taken out of the oven. Cool the cupcakes in the pan for a few minutes and then move them to a cooling rack. Here is what the cupcakes will look like after baking:


Making sure you allow the cupcakes to cool completely, prepare the buttercream frosting.

The Best Buttercream Frosting

1 cup butter, room temperature
1 cup shortening (allows for easy decorating texture)
3 pounds powdered sugar
1 Tbs. pure vanilla extract
1/2 tsp. almond extract (OPTIONAL - but I always use it)
1/4 tsp. salt
3/4 cup milk
Food coloring

Beat butter and shortening together. Add powdered sugar, vanilla, salt, and milk. Beat until smooth. Add more milk if frosting is too thick, add powered sugar if frosting is too thin. This recipe makes a TON of frosting. You can easily half it and you will still have plenty OR you can freeze what ever you have left over.

Divide frosting and color with food coloring using your color(s) of choice. For these cupcakes I used a bright pink and blue. I added them together in a frosting bag and the result I got was a beautiful swirl...


And there you go...now you know how to make fun, groovy, tye dye cupcakes. Here is a picture of the ones I made last weekend so you can see what the inside looks like...


If you have questions, just ask! I'm off to fold one load of laundry, make lunches and then go to bed and it's 1:12am. There's never enough time! Oh, well!


Tuesday, January 4, 2011

No more paci....

The paci fairy came last night. It broke our hearts to take all of Jovie's pacifiers and throw them away. I guess it was the realization that she is a toddler and no longer a baby. I wasn't prepared for the emotions of this task. She loves her paci but wasn't ever dependent on it. It was more of a soothing thing, only at night. She still has her blankies, and we will never take away those. Praying that tonight isn't dramatic since there are no more pacifiers.